Search engine optimization (SEO) is crucial for any website aiming to increase its visibility and reach a broader audience. One of the essential aspects of ghost SEO is the proper use of canonical URLs to prevent duplicate content issues and consolidate ranking signals. If you’re using Ghost CMS for your blog or publication, you might be wondering how to add custom canonical URLs to your posts. In this guide, we’ll walk you through the process step-by-step.
What is a Canonical URL?
A canonical URL is the preferred URL of a web page that you want search engines to index. It tells search engines which version of a page to consider as the authoritative one, especially when there are multiple URLs leading to similar or duplicate content. By specifying a canonical URL, you help prevent duplicate content penalties and ensure that your SEO efforts are concentrated on a single URL.
Why Customize Canonical URLs in Ghost CMS?
While Ghost CMS automatically sets the canonical URL to the original URL of your post, there are scenarios where you might want to customize it:
• Syndicated Content: If you’re republishing content from another site, you should point the canonical URL to the original source.
• Multiple Versions of a Page: When you have similar content across different URLs, specifying a canonical URL helps consolidate SEO value.
• URL Changes: If you’ve changed the URL structure of your site, setting canonical URLs ensures that search engines index the correct pages.
How to Add Custom Canonical URLs in Ghost CMS
Ghost CMS provides a straightforward way to add custom canonical URLs to individual posts using the Code Injection feature. Here’s how you can do it:

Step 1: Log into Your Ghost Admin Dashboard
Navigate to your Ghost CMS admin panel by visiting https://yourdomain.com/ghost and log in with your credentials.
Step 2: Navigate to the Post Editor
• For a New Post: Click on the “New Story” button to create a new post.
• For an Existing Post: Click on the post you wish to edit from the list of existing posts.
Step 3: Open Post Settings
In the post editor, click on the gear icon located at the top right corner to open the Post Settings sidebar.
Step 4: Scroll to the Code Injection Section
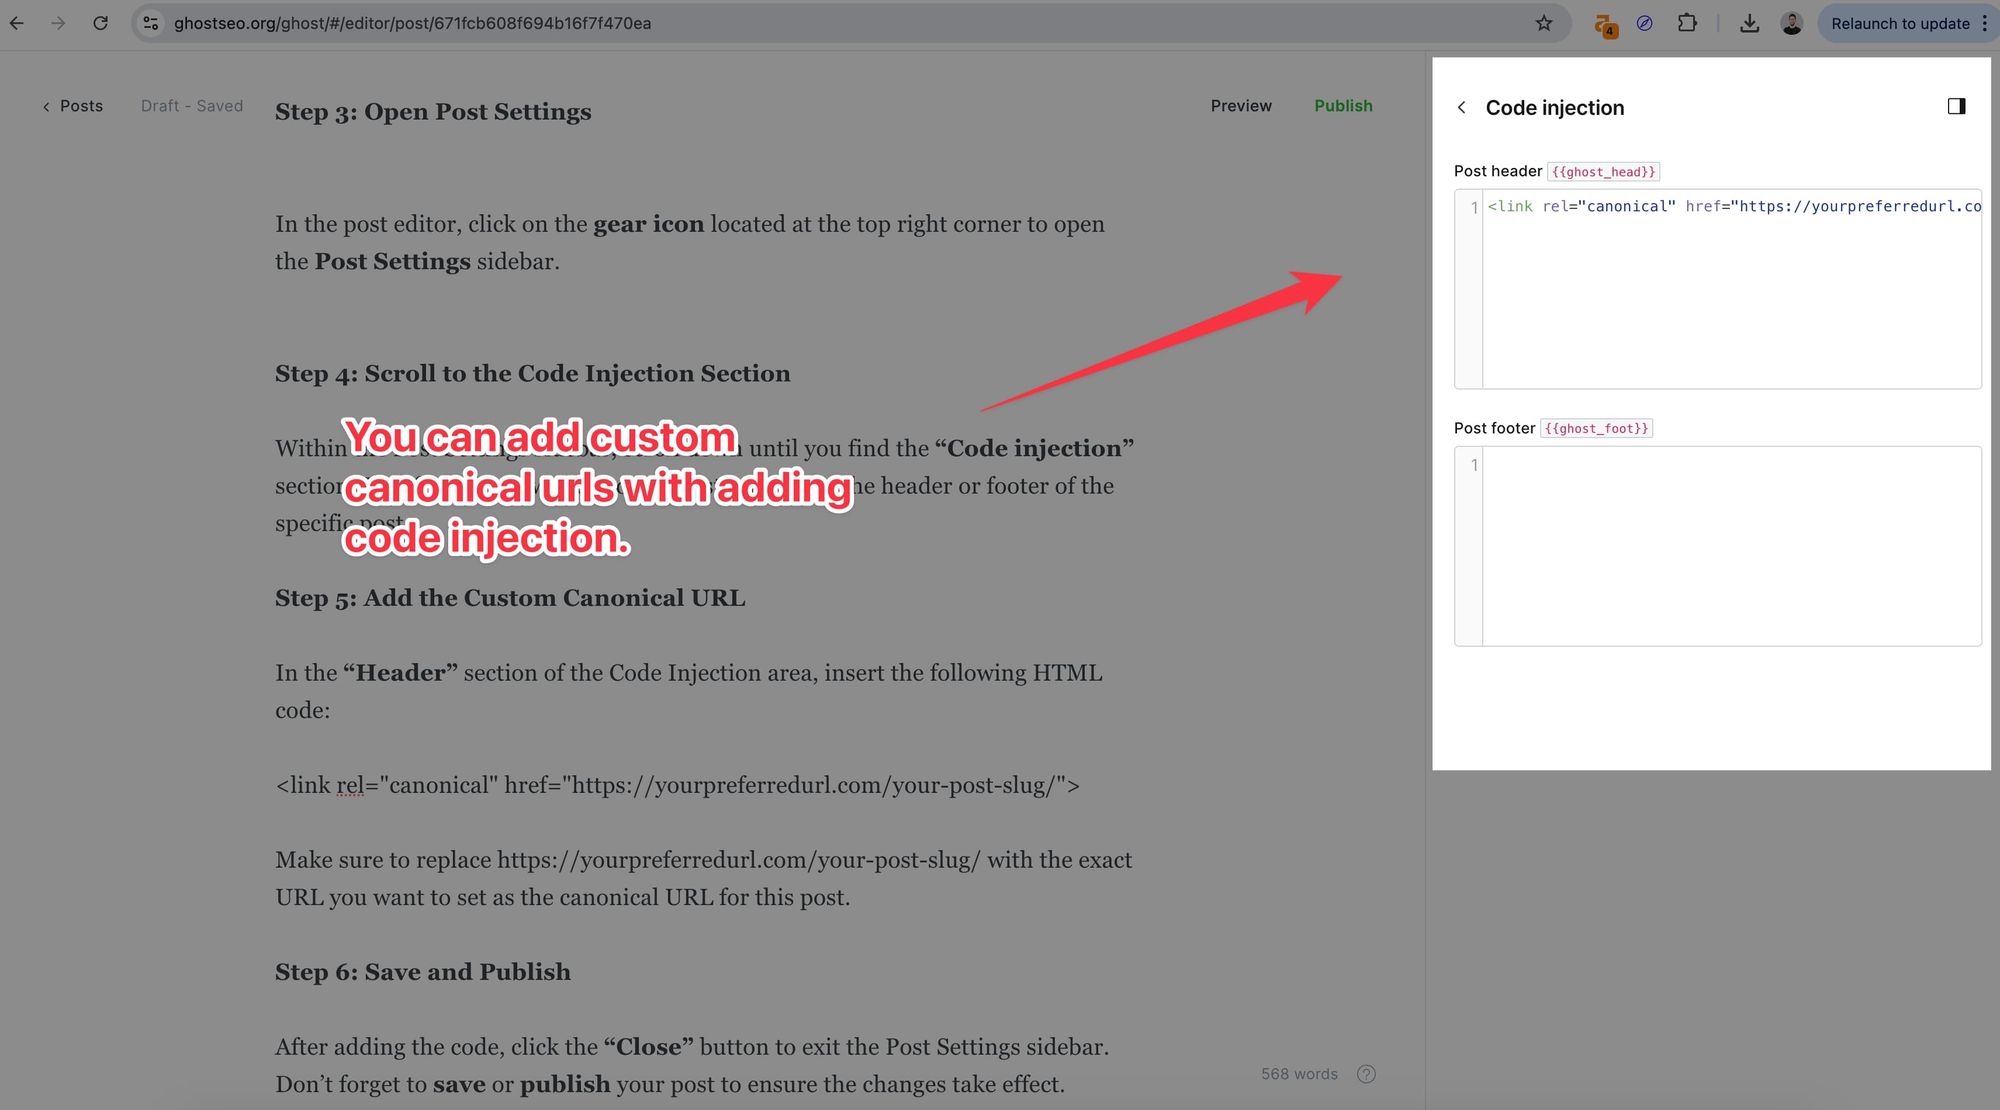
Within the Post Settings sidebar, scroll down until you find the “Code injection” section. This feature allows you to add custom code to the header or footer of the specific post
Step 5: Add the Custom Canonical URL
In the “Header” section of the Code Injection area, insert the following HTML code:
<link rel="canonical" href="https://yourpreferredurl.com/your-post-slug/">
Make sure to replace https://yourpreferredurl.com/your-post-slug/ with the exact URL you want to set as the canonical URL for this post.
Step 6: Save and Publish
After adding the code, click the “Close” button to exit the Post Settings sidebar. Don’t forget to save or publish your post to ensure the changes take effect.
Verifying the Canonical URL
To confirm that the custom canonical URL has been applied:
1. View the Published Post: Open the post in your browser.
2. Inspect the Page Source: Right-click on the page and select “View Page Source” or use the developer tools.
3. Search for the Canonical Tag: Use Ctrl + F (or Cmd + F on Mac) to search for <link rel="canonical">.
4. Verify the Href Attribute: Ensure that the href attribute matches
Additional Tips and Advanced Techniques
Using Global Code Injection for Site-Wide Canonical Tags
If you need to apply a custom canonical URL across your entire site—for instance, when migrating to a new domain—you can use Ghost’s global Code Injection feature:
1. Access Site Settings: In your Ghost admin dashboard, click on the “Settings” icon located in the main navigation menu.
2. Select Code Injection: From the settings menu, choose “Code injection”.
3. Add Canonical Tag in Site Header: In the “Site Header” section, insert the following code:
<link rel="canonical" href="https://yournewdomain.com{{url}}">
This code dynamically generates canonical URLs for all your pages, pointing them to the new domain.
4. Save Changes: Click the “Save” button to apply the changes site-wide
Note: Be cautious when using global code injection, as it affects every page on your site.
Utilizing Custom Templates for Canonical URLs
For more advanced control, you can create custom templates within your Ghost theme:
1. Download Your Theme: Navigate to “Settings” > “Design”, scroll down to “Themes”, and click “Download” next to your active theme.
2. Edit Template Files: Unzip the theme package and open the relevant template files (e.g., post.hbs) in a code editor.
3. Modify the Canonical Link: Replace or add the canonical link tag with:
{{#if canonical_url}}
<link rel="canonical" href="{{canonical_url}}">
{{else}}
<link rel="canonical" href="{{url absolute="true"}}">
{{/if}}
This code checks if a custom canonical URL is set and uses it; otherwise, it defaults to the standard URL.
4. Upload the Modified Theme: Compress the theme files back into a .zip folder and upload it via “Settings” > “Design” under the “Themes” section.
5. Activate the Theme: After uploading, click “Activate” to make it your live theme.
Using the Ghost API for Bulk Updates
If you have numerous posts that require custom canonical URLs, you can use the Ghost API to automate the process:
1. Generate an API Key: In your Ghost admin, go to “Integrations” and create a new custom integration to obtain API credentials.
2. Use a Script: Write a script in a language like JavaScript or Python that utilizes the Ghost Admin API to update posts.
3. Set Custom Canonical URLs: Your script can loop through posts and set the canonical_url property as needed.
Warning: This method is recommended for advanced users comfortable with programming and APIs.
If you have issues with connical urls you can check seomator's guide for that.
Frequently Asked Questions (FAQs)
Can I Set Different Canonical URLs for AMP Pages?
Yes, if you’re using Accelerated Mobile Pages (AMP), you can specify a canonical URL for AMP pages separately by modifying your theme’s amp.hbs file or using code injection specific to AMP.
How Do Canonical URLs Interact with Pagination?
For paginated content, Ghost automatically includes rel="next" and rel="prev" links. Canonical URLs should generally point to the main page of the content series to consolidate SEO value.
Is There a Plugin to Manage Canonical URLs in Ghost?
As of now, Ghost does not support plugins in the same way platforms like WordPress do. However, most SEO-related tasks can be accomplished through built-in features, theme modifications, or the Code Injection tool.
What Happens If I Set Incorrect Canonical URLs?
Setting incorrect canonical URLs can confuse search engines, leading to indexing issues or loss of ranking. Always double-check the URLs for accuracy and relevance.
Did you find this guide helpful? Feel free to share it with your network and help others optimize their Ghost CMS sites!


