In this quick guide, we'll explore how to enable HTTP caching for your Ghost-powered blog using Cloudflare. This process might not suit every setup, so please read carefully before implementing the steps.
Background
My blog is mainly static, with updates occurring only when I personally modify or add content. I've set up Cloudflare to manage my blog's traffic and now aim to leverage Cloudflare’s caching capabilities to minimize direct requests to my Ghost server by serving cached content from Cloudflare’s edge servers.
Step 1: Enable Caching in Ghost
Ghost’s configuration is managed through a config file, typically named config.production.json for production environments. Learn more about Ghost’s config options HERE.
In your Ghost config file, locate or add the caching section:
"caching": {
    "contentAPI": {
        "maxAge": 60
    },
    "frontend": {
        "maxAge": 600
    }
}
Here is an example of a complete config file with the caching settings included:
{
    "url": "https://example.com",
    "database": {
        // Database settings
    },
    "caching": {
        "contentAPI": {
            "maxAge": 60
        },
        "frontend": {
            "maxAge": 600
        }
    }
}
In this configuration, API responses are cached for 60 seconds, and HTML content is cached for 600 seconds (10 minutes). Adjust these values to suit your needs.
Step 2: Set Up Cloudflare
Ensure your blog is already set up with Cloudflare. If not, follow their documentation to add your site.
Understanding Edge Cache vs. Browser Cache
- Browser Cache: Stores certain site files locally on a user's device, making subsequent visits faster.
- Edge Cache: Stores site content on multiple servers worldwide (edge servers), delivering content from the nearest server to reduce load times and server strain.
Using Cloudflare’s extensive network of edge servers for caching can significantly enhance content delivery speed, especially for users far from the original server.
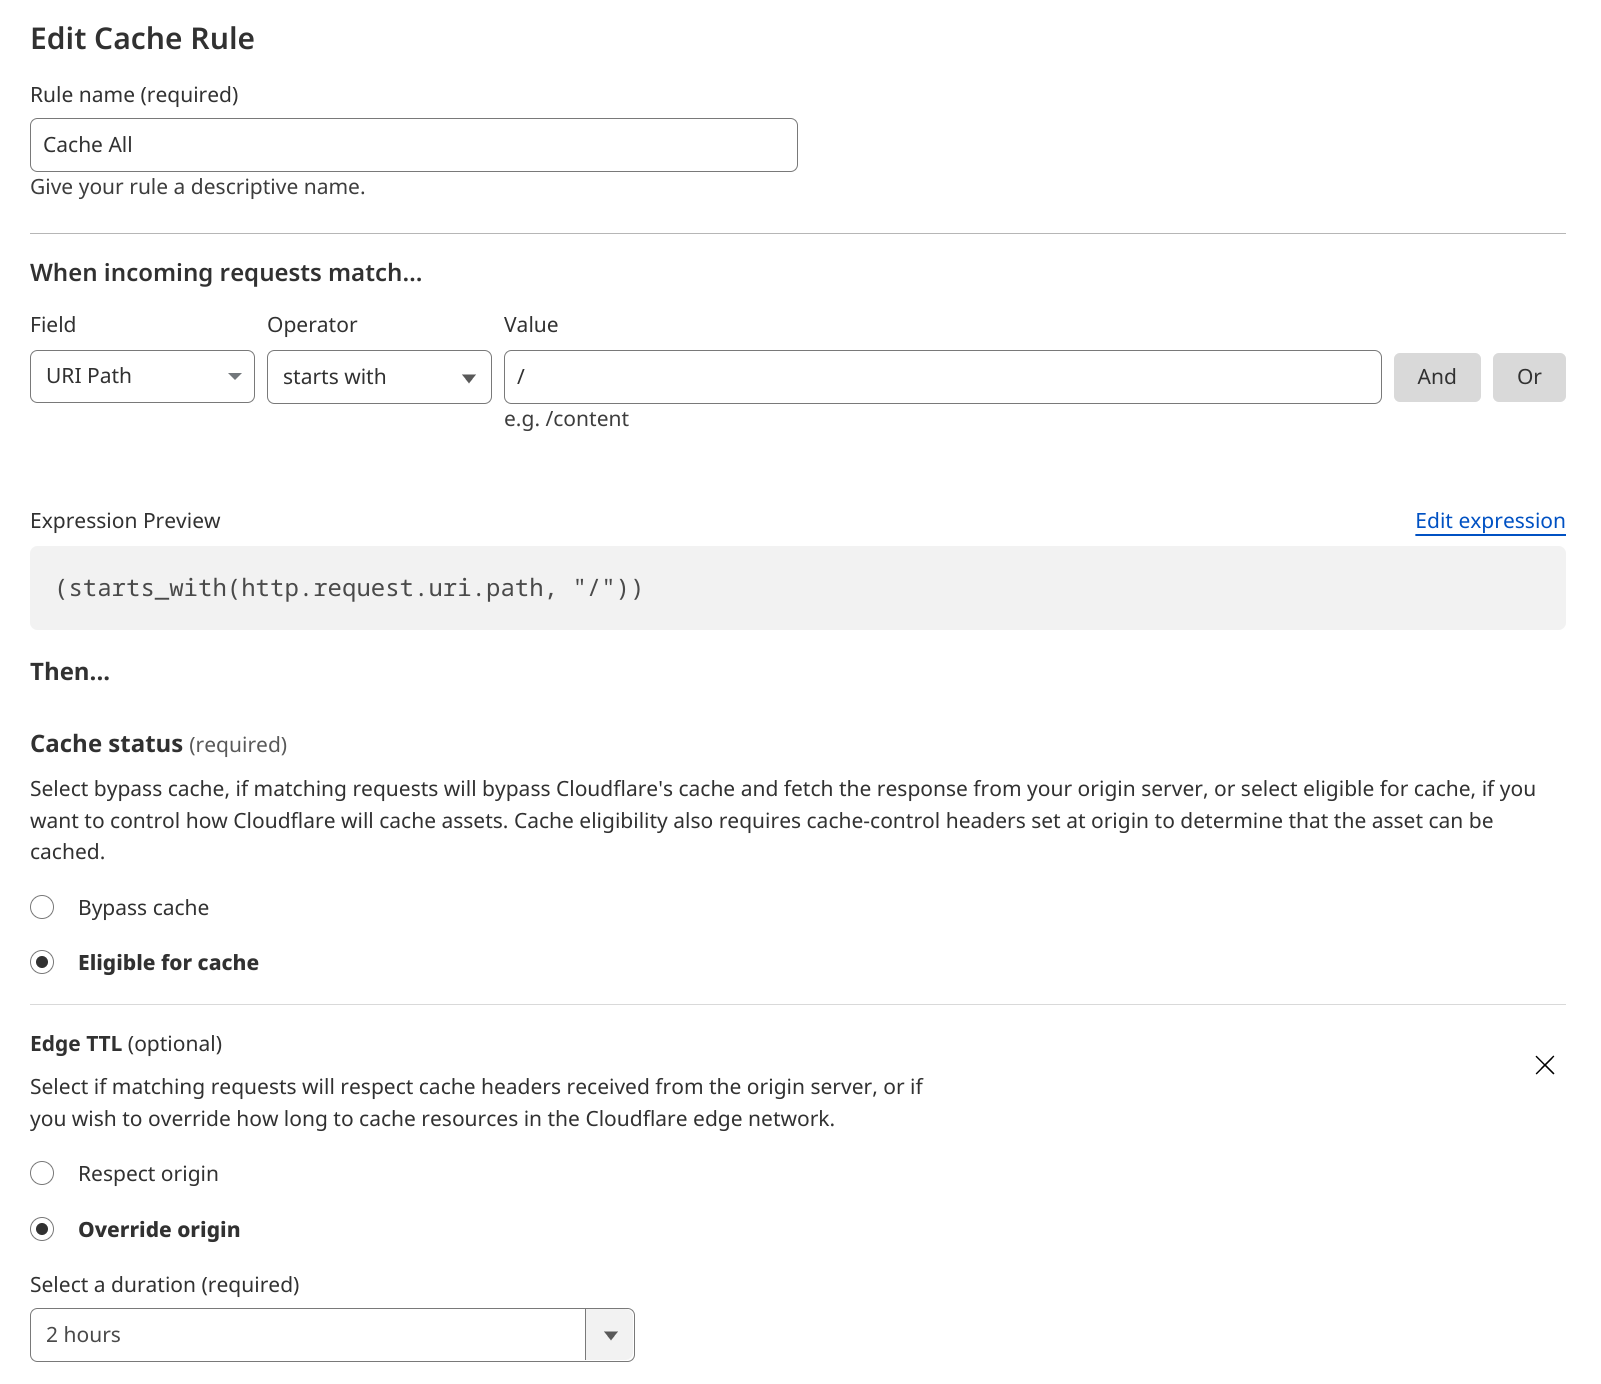
Step 3: Set Up a Caching Rule in Cloudflare

In your Cloudflare dashboard, navigate to the Page Rules section and create a new rule for your blog’s URL path (e.g., /*).
- Set
Edge Cache TTLto 2 hours. This ensures Cloudflare caches your content for this duration, overriding server cache headers if necessary.
Refer to Cloudflare documentation for detailed steps on creating page rules.
Step 4: Verify Caching
Using Command Line with curl
Run the following command to check if your blog is cached:
curl -vso /dev/null https://your-website-address/ 2>&1 | grep -i age:
If the age header shows a value above 0, your content is cached. If it shows 0, repeat the command a few times to allow Cloudflare to cache the content.
Using Browser Developer Tools
- Open Google Chrome and navigate to your blog.
- Right-click and select ‘Inspect’ or press
Ctrl + Shift + Ito open Developer Tools. - Go to the ‘Network’ tab.
- Refresh your page.
- Click on the first request (your blog URL) and check the ‘Response Headers’ for
Cache-ControlandAgeheaders. These should reflect your Cloudflare caching settings.
By setting up Cloudflare to cache your Ghost blog, you can improve load times and reduce server load. Always verify your setup to ensure caching works as expected, and adjust TTL values based on your blog’s traffic and content update frequency.
FAQ
1. What is the purpose of caching my Ghost blog with Cloudflare?
Caching your Ghost blog with Cloudflare improves load times for visitors by serving cached content from Cloudflare's edge servers, reducing the number of requests that hit your Ghost server. This can enhance user experience and reduce server load.
2. Will caching work for all types of content on my Ghost blog?
Caching is most effective for static content that doesn't change frequently. Dynamic content that updates often may not benefit as much from caching. It’s essential to configure caching settings appropriately based on your content update frequency.
3. How do I enable caching in my Ghost config file?
Add the following section to your Ghost config file (config.production.json):
"caching": {
    "contentAPI": {
        "maxAge": 60
    },
    "frontend": {
        "maxAge": 600
    }
}
Adjust the maxAge values to suit your preferences.
4. What is the difference between Edge Cache and Browser Cache?
- Browser Cache: Stores files locally on a user’s device, speeding up subsequent visits to the site.
- Edge Cache: Stores content on Cloudflare’s global network of servers, delivering it from the nearest location to the user, reducing load times and server strain.
5. How do I set up a caching rule in Cloudflare?
In the Cloudflare dashboard, go to the Page Rules section and create a new rule with the following settings:
- URL pattern:
/* - Setting:
Cache Level - Value:
Cache Everything - Edge Cache TTL:
2 hours
6. How can I verify if my blog is being cached correctly?
You can verify caching using the curl command line tool or through your browser’s Developer Tools. Check the age and Cache-Control headers in the response to ensure caching is working as expected.
7. Can I remove cached content from Cloudflare?
Yes, you can purge the cache from the Cloudflare dashboard. However, you cannot remove cached content from a user’s browser cache. Be mindful of this when setting TTL values.
8. What should I do if my blog's content updates frequently?
If your content updates frequently, consider setting lower TTL values to ensure that visitors receive the most up-to-date content. You can also use Cloudflare's API to programmatically purge cache for specific URLs when updates occur.
9. Will enabling caching affect my blog's performance?
Enabling caching generally improves performance by reducing server load and speeding up content delivery. However, improper configuration or overly aggressive caching settings might lead to outdated content being served. Test your settings thoroughly to find the optimal balance.
10. Where can I find more information about Ghost and Cloudflare configuration options?
For more information about Ghost configuration options, visit the Ghost Documentation. For detailed Cloudflare setup instructions, refer to the Cloudflare Documentation.

